Tile Calculator
Calculate the tile material needed for your floor, wall, or backsplash project by entering your project dimensions. Estimate the cost of materials by entering the price per below.
Material Estimate:
| Tiles Needed: | |
| Boxes Needed: |
Material Cost
| Estimated Price: | $ |
Total Area
| Square Feet: | |
| Square Meters: |
On this page:
- Tile Calculator
- How to Calculate How Much Tile You Need
- Step One: Calculate the Floor or Backsplash Area
- Step Two: Calculate the Area of the Tile
- Step Three: Estimate Tile Quantity
- How to Estimate Tile Patterns
- How to Estimate Thinset or Mastic
- Other Materials Needed
- Common Tile Sizes and Coverage
- Hiring a Professional
- Frequently Asked Questions
How to Calculate How Much Tile You Need
Tile is a very popular option for flooring and backsplash projects. Tiles are durable, easy to clean, and have endless design possibilities.
They are available in many sizes and materials, including glass, ceramic, porcelain, and natural stone. They can be used anywhere in and around the home, with bathrooms, backsplashes, and flooring being the most common areas.
Because tiles come in so many sizes and there are so many installed patterns available, it can seem complicated to estimate how much tile you may need for a project. Tile estimates are fairly simple to calculate, though, once you have a few pieces of information.
You can calculate how much tile you need in just a few easy steps.
Step One: Calculate the Floor or Backsplash Area
The first step is to know how large of an area you want to cover. Begin by measuring the room or wall lengths and widths in feet, then multiply these measurements together to get the area in square feet.
To measure like a pro, learn pro tips for measuring irregular rooms.
For smaller spaces, such as a kitchen backsplash, you may find it easier to measure in inches. Inches are easier to use for smaller spaces because, in most cases, these will fall somewhere between even feet measurements.
If you measured in inches, then multiply the length and width of each area in inches together to get the square inches of that area. Divide by 144 to convert to square feet.
Measure smaller areas individually. Then, add all your areas together. Plug the total lengths and widths into the calculator above.
You can easily find the square footage of your project using our square footage calculator.

In some cases, tile is sold by the square foot. If that’s the case for the tile you’re ordering, then you can use the square footage of the space to order your material.
Most tiles are sold by the box, which may contain varying amounts of square feet. Keep reading to see how to determine how many tiles you may need for a flooring or backsplash project.
Step Two: Calculate the Area of the Tile
Tiles come in many sizes, and costs vary widely. Some can be purchased individually or in individual sheets, and some by the box. Boxes and sheets cover different square foot areas as well.
If you know what tiles you would like to use, enter the size into the calculator above. Don’t forget to enter how much square footage the box covers if you use that method.
If you are using sheets, enter the sheet size. The calculator will also give you a cost estimate if you know the price per tile, sheet, or box.
To do this calculation yourself, take your tile size in square inches and divide it by 144 (12in. x 12in.). This gives you the tile size in sq ft.
Step Three: Estimate Tile Quantity
Once you know the area you need to cover and the area of each tile, divide the total area by the tile size in sq ft. This will give you the number of tiles you need for your space.
For boxes, divide the area by the sq ft coverage for the box.
Use the result to order your tiles, keeping in mind that ordering an extra 10% to 20% is a good idea to allow for cuts and waste. 10% is standard for straight-set installations; if you are using a pattern or laying the tiles on the diagonal, 15% to 20% extra is recommended.
For example, to estimate tile for a kitchen backsplash area that is 12′ long and 18″ deep using a 4″ x 4″ tile.
Step one: measure the area to cover:
Convert inches to feet: 18″ ÷ 12 = 1.5 ft
Find total area: 1.5′ × 12′ = 18 sq ft
Step two: measure tile area:
Calculate tile size in sq ft: (4″ × 4″) ÷ 144 = 0.111 sq ft
Step three: estimate tile
Find the total number of tiles needed: 18 sq ft ÷ 0.111 sq ft × 1.1 (overage) = 178
How to Estimate Tile Patterns
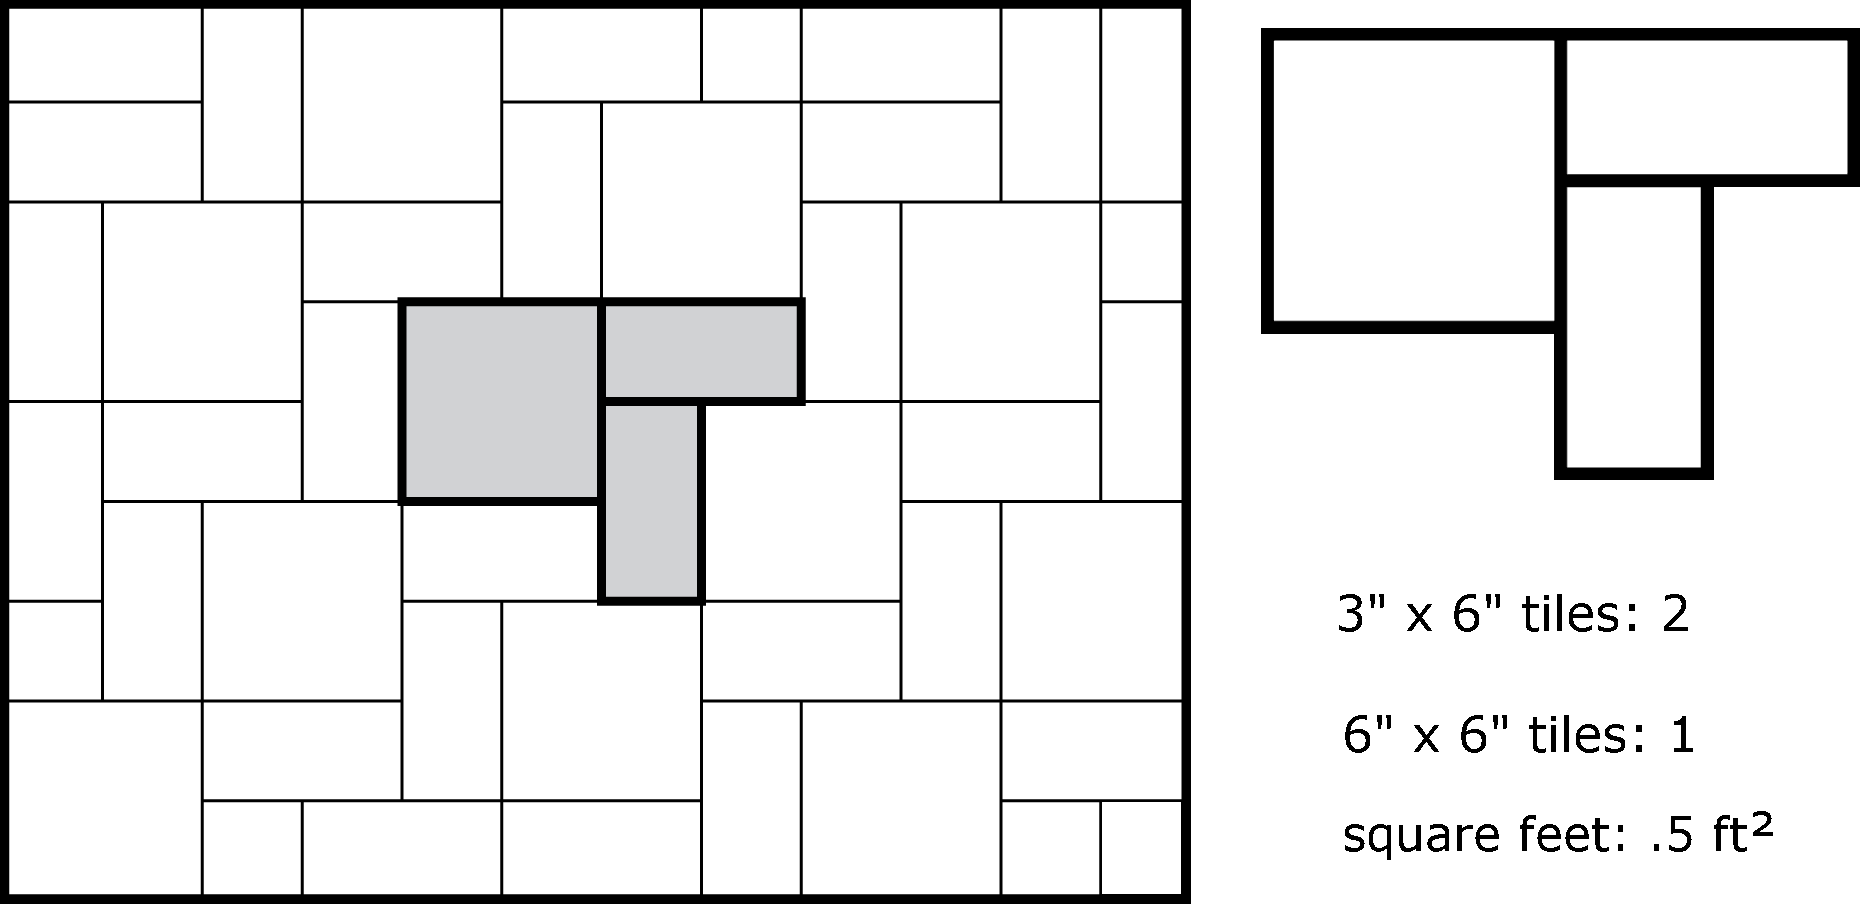
Kitchen and bath tile is often installed in a pattern using different sizes. To estimate the amount of tile you’ll need, you can find the square footage of the repeating pattern and then estimate how many instances of that pattern are needed, then multiply by the number needed to create the pattern.
For instance, if your pattern requires one 6×6 and two 3×6 tiles, then add the square footage of both tiles together to find the square footage of the pattern. Then divide the floor ft2 by the tile ft2.

Keep in mind, however, that if the tile is not sold as a packaged pattern, you will need to determine the square footage of each tile separately, and order that amount, then piece the tiles together in the pattern.
For example, using the above tile sizes, you would need equal amounts of both tiles – simply divide the total square footage in half, add 20% for waste, and order equal amounts of each size. However, for other tile sizes and patterns, you may need more square footage of one tile than another, so the tiles will need to be calculated separately.
Some layout patterns that use the same size tiles, such as a herringbone, subway pattern, or diagonal pattern, may also influence how much material will be required since there will be varying amounts of cuts and waste when using different layouts.
While some patterns result in more waste than others, a good rule of thumb is when installing tile at an angle, consider ordering 20% additional material to account for more cuts and waste.
How to Estimate Thinset or Mastic
You’ll need to choose either thinset or mastic to adhere your tiles, the which you choose depends on your tiling application. Some tile materials, such as stone or glass, will dictate that you use a latex-modified, white thinset mortar.
Ceramic and porcelain tiles may use thinset on the floor and mastic on the walls, however, if you are choosing to use a large format tile on the walls, you will also need a latex-modified thinset mortar to hold the weight of the larger tiles.
Calculating how much thinset or mastic you need requires choosing a trowel size for your project. Larger and smaller notch trowels require more or less thinset.
Different thinset and mastic products will cover different amounts, and most will have a coverage chart on the bag indicating how many square feet the product covers for your trowel. If you don’t have access to the coverage chart, you can learn how to estimate thinset material.
Other Materials Needed
In addition to tile and thinset, you’ll need some additional material for your project.
First is a solid backer board to properly support the surface and prevent cracking. This can be found in 3′ x 5′ sheets at your local home center and comes in 1/4″ and 1/2″ thicknesses.
We also recommend getting some good grout spacers to set an even spacing between each tile.
Never butt tiles against one another, as this can cause cracking and damage to the edges of the tile. The more even the tile is, the thinner the grout joint. Handmade tiles and rustic tiles will require larger grout joints than rectified porcelain tiles.
You’ll also need to get grout, which is available in sanded and unsanded varieties. Choose unsanded grout if your spacing is 1/8″ or less, unless otherwise specified, such as with glass tile.
Grout amounts will vary by the size of the tile. A large format tile will need less grout than a mosaic, for example. If installing a deep tile or rounded tile, such as a river rock mosaic, you will need two to four times the amount of grout as with a flat tile.
Common Tile Sizes and Coverage
| Tile Size in Inches | Tile Size in Centimeters | Tiles per 100 ft2 |
|---|---|---|
| 4″ x 4″ | 10 cm x 10 cm | 900 |
| 3″ x 6″ | 7.5 cm x 15 cm | 800 |
| 6″ x 6″ | 15 cm x 15 cm | 400 |
| 4″ x 24″ | 10 cm x 61 cm | 150 |
| 12″ x 12″ | 30 cm x 30 cm | 100 |
| 16″ x 16″ | 41 cm x 41 cm | 57 |
| 18″ x 18″ | 46 cm x 46 cm | 45 |
| 18″ x 24″ | 46 cm x 61 cm | 34 |
Hiring a Professional
Tiling can be a fun DIY project. But an experienced tile contractor can make the difference between a “good” outcome and a “professional” outcome.
Another advantage in hiring a contractor is that you needn’t worry about miscellaneous expenses like renting a tile cutter, what type of mortar and trowel to use, or how many spacers you need. We can help you find local tile installation professionals who can give you project cost estimates for your project.
To estimate other flooring materials, visit our carpet or flooring calculators.
Frequently Asked Questions
What is the 3 4 5 rule for laying tile?
The 3, 4, 5 rule for laying tile refers to making sure your tiles are laid square even if the walls are not.
Make a grid of chalk lines on the floor, and measure one chalk line 3 feet out from center, and the intersecting chalk line 4 feet out from the center, now measure a straight diagonal line between the two marks; if it measures 5 feet, you have a right angle.
This method uses the Pythagorean theorem based on the rules for right triangles.
How many tiles are in a box?
This depends on many factors, from the size of the tile to the manufacturer. You may have anywhere from 10 tiles to 90 tiles in one box.
What is the standard tile size?
There is no single standard tile size. Tiles may be in any measurement from ⅜” to 48” square, with many rectangular, diamond, and even circular measurements in between.
How much extra tile do you need?
For the average installation, 10% extra is usually fine. For a pattern, 20% extra is recommended.


